Tuesday, November 15, 2011

A Triumphant Return: Bacon-Wrapped Cornbread Stuffing Balls!

Folk(s), it has been way too long. But to make up for it, I'm pulling out what is quite possibly my most popular recipe to date: Bacon-Wrapped Cornbread Stuffing balls. Need I say more?

Naked Bacon Soldiers
Funny story: this picture was taken December 31st, 2010! The rest were taken November 2011.
The first step of any good cornbread stuffing is good cornbread crumbs. This is the second-most important ingredient, so you could buy your own (5c. sounds like a good amount) or you can make your own. This happens to be my favorite recipe (adapted from here):

Spiced Sweet Cornbread (make the day before)
  • 1 cup yellow cornmeal
  • 1 cup white flour
  • 1 cup milk
  • 1/3 cup white sugar
  • 1/3 cup honey
  • 1/3 cup oil*
  • 1 egg
  • 2 Tbsp ground cumin (adjust to taste)
  • 2 Tbsp ground chili powder
  • 2 tsp baking powder
  • 1 tsp salt
  • 1 tsp cayenne pepper (optional)
  • 1 Tbsp butter (optional)
Preheat oven to 400. If you have a cast iron skillet, preheat it in the oven as well. Otherwise, go and buy one while the oven is preheating.

In a medium sized mixing bowl stir together all ingredients except the butter until thoroughly mixed. When the cast iron is heated, add the butter and swirl around to coat the whole pan. Pour the batter in the pan and cook for 20-25 minutes. The cornbread should be dry but not burnt (if you don't use a cast iron skillet, increase the time by about 5 minutes; if you are making this recipe for anything other than crumbs, cut the time by about 5 minutes).

Once the bread has cooled a bit, place it in a bowl or cookie sheet, and crumble. I find a dough blender works really well for this. You could probably also use a food processor; I don't happen to have one. Leave out overnight to dry.

*To add a kick, used a spiced chili oil. I made mine using a handful of red Thai chilies with the stems cut off (keeping the seeds), simmered over low heat in about a quart of canola oil until bubbles began to form on the surface of the peppers. I removed from the heat, let cool to room temperature, then blended in a blender. Mine kept for over a year in a squeeze-top bottle in the fridge.

Grilled Vegetables (can be made the day before)
  • 2-3 mild peppers (red and green bell pepper, poblano, pasilla, etc.)
  • 1-2 spicy peppers (jalapeƱo; habanero if you are especially bold)
  • 1 medium onion
  • 1 tsp salt
Quarter the onion through the root, leaving the root intact. Remove any loose peels, but don't worry about getting every last one; they will likely burn off in the grill anyway.

Grill the (whole) peppers and (quartered) onions over high heat until the outsides are nice and charred.

Remove from heat. After the peppers are cooled, remove all peels, seeds, stems, etc. (You don't have to be perfect about removing all the charred bits — it adds flavor.). Mince all the vegetables and mix with the salt. Cover and store until needed.

The Day Of
  • ~16 pieces of thick cut bacon. The kind of bacon I like is 24oz for 16 pieces.
  • 2-3 eggs
Preheat oven to 325.

Stir together the cooled, grilled veggies with the  cornbread crumbs, then add eggs, one at a time until the mixture is moist, but not wet. The mix should be able to hold together when lightly pressed. Cut the bacon in half.
Naked Bacon Soldiers
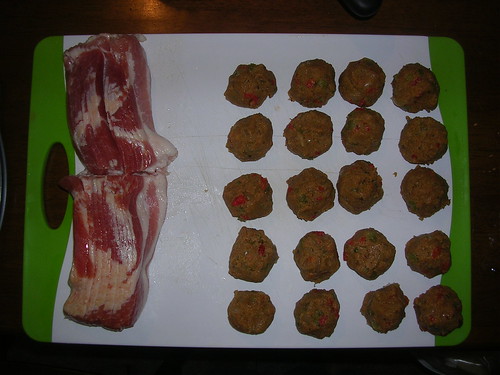
Naked stuffing balls awaiting a tasty meat blanket

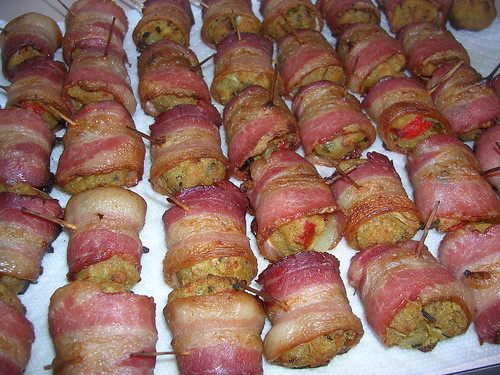
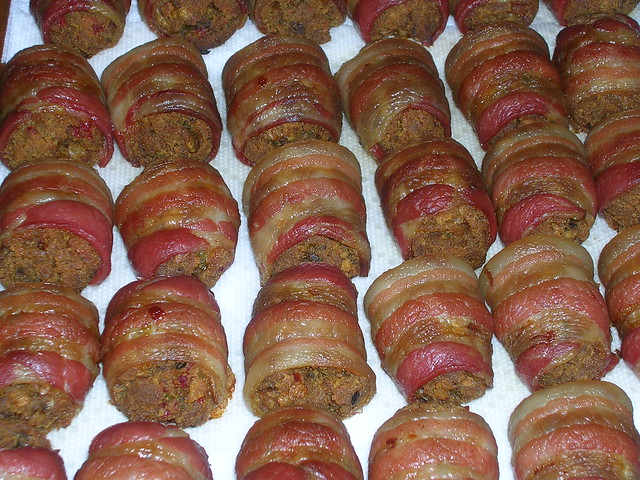
Using wetted hands, grab a small handful of the mix and very lightly press together to make golf ball-sized balls. Wrap each ball with a half slice of bacon, and set on a nonstick cookie sheet, seam side down. (You can also use toothpicks for a handy appetizer, but I find they stick together rather well without.)

Bacon SoldiersBacon Soldiers
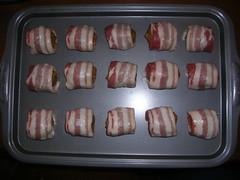
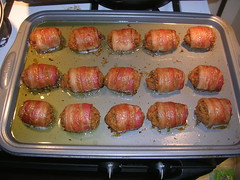
Before and after. It's magic!

Bake the balls for 45-60 minutes, checking and rotating every 10-15 minutes. When the bacon is firm but not crispy, and the cornbread is golden brown, they are done. Drain on paper towels, then enjoy! They are good hot or room temperature.

Bacon Soldiers

Sunday, October 10, 2010

Carrot Cheesecake!

I love cheesecake, and it's one of those things you you can make without searching for a recipe or trying really hard, which makes it great for an impulsive dessert. It's also a really easy dessert to customize. This week I was craving carrot cake with cream cheese icing, but that would require a recipe and I'd get flour all over the place and really I was just too lazy for all that. Thus the carrot cheesecake was born.

Graham Cracker Crust
  • Graham crackers (um.... I forgot to count. Let's say 12-ish)
  • Cold, unsalted butter (yeah, failed to measure this one too. I'll call it 3 Tbsp. Ish.)
  • 2 Tbsp. sugar. Or so.
Place all ingredients into a food processor and obliterate until it looks crusty. There should be enough butter so that it holds together when pressed, and enough grahams to cover the bottom of an 8-inch springform pan. You can't really mess this up, so just adjust as you go. Note that a lot of crust recipes require you to melt the butter first, but what happens when you add a liquid to a graham? You get mud. I dunno bout you, but I'm not a fan of mudcrust.

Press the crust into the bottom of your pan and bake at 350 for about 7 minutes. Set to cool while you do the rest.

Carrot Filling
  • 2 cups shredded carrots (about 4 carrots worth)
  • 1 cup apple juice
  • 1/2 cup raisins
  • 2-3 pieces candied ginger, minced (about 1Tbsp)
  • 2 Tbsp brown sugar
  • 1/2 Tbsp ground cinnamon
  • 1 tsp each fresh grated nutmeg and ground allspice
  • 1/4 tsp ground clove
  • Tiny pinch salt
Place all ingredients in a 1-quart pot and simmer over low heat for 10-15 minutes, or until all juice is absorbed/evaporated and carrots are no longer crunchy. If the liquid boils away before the carrots are done, add more 1/2 cup at a time. Adjust the spices to taste, then set aside to cool.

Cheesecake Base
  • 2 packages (8 oz. each) cream cheese at room temperature
  • 4 eggs
  • 3/4 cup sugar
  • 1 tsp vanilla
  • 1/2 cup toasted walnut pieces
  • 1/2 cup toasted pecan pieces
 In a large bowl, blend the cream cheese until thoroughly soft. Add the eggs, sugar, vanilla and blend on low speed. Add the carrot mixture and the nuts and blend to combine. Pour the batter onto the crust then bake for about 35 minutes or until all but the center-most 2-inches is firm.

Note: contrary to many other theories going around, cracking is caused by overcooking. Since the cake cools from the outside in, and since it holds heat for a long time, cooking it until the middle is just underdone will allow the cake to coast to a perfect finish.

But then again if it does crack, just eat that one all yourself and make another one to show off to others :)

Monday, August 16, 2010

Banana-Tamarind Spring rolls with Coconut Ice Cream and Caramel Sauce

Battle Tamarind and Brown Sugar!

Tamarind is something that I associate with Thai food, so I decided to try a dish inspired by my one of my favorite Thai desserts, the fried banana. It all starts with...

Coconut Ice Cream

If you can't tell yet, I'm a gigantic fan of coconut milk. I could drink it straight, but that's generally frowned upon. So let's freeze it instead!
  • 6 egg yolks
  • 1 cup sugar
  • 1 tsp vanilla
  • Big ol' pinch of salt
  • 2 cans (27 total ounces), unsweetened coconut milk
 In a large bowl, whisk together egg yolks, sugar, vanilla, and salt until thoroughly combined. Slowly whisk in the coconut milk, then transfer to a 2 quart pot over medium-low heat, stirring constantly. Heat the mixture until it reaches 180 degrees Fahrenheit (or until it thickens enough to coat the back of the spoon; it should give off whisps of steam, but not be boiling), then put into a container to chill for a minimum of 4 hours (overnight is best).

Freeze the mixture using the directions on your ice cream machine. This recipe might be a little big for smaller tabletop ice cream makers; after overrun (air incorporation) I had about a quart and a half of ice cream.

Caramel Sauce

A little word of warning: I make caramel sauce the hard way (because I'm lazy and it takes fewer steps). If you are fast and loose in the kitchen you can use these directions, otherwise this looks like a great recipe which will get you similar results.

  • 8 Tbsp unsalted butter*
  • 3/4 c. brown sugar
  • pinch of salt
  • ~1/3 cup milk*
  • 1 tsp vanilla
Melt butter over medium heat, then add the brown sugar and salt. Whisk constantly until sugar is completely dissolved and starts to foam up. Carefully and slowly add the milk, while whisking like a mad (wo)man. I generally add a splash, whisk like mad, add another splash, whisk again, etc. until it looks about right. You want a smooth, thick sauce that has a nice sheen to it. Don't forget that the sauce will thicken as it cools, so don't make it too thick to start out.

*I never have heavy cream on hand, and it's too expensive to buy a pint just to use a couple tablespoons. If you do happen to have it on hand, you can cut the butter and use heavy cream instead of milk. Otherwise, the added butter is needed to keep the milk proteins from curdling.

Banana-Tamarind Spring Rolls

A while back I decided to make Pad Thai, and the recipe I used needed 1 Tbsp of tamarind concentrate. Since then I've used exactly 0 of the stuff, so I'm glad to finally get some use out of it!


DSCN1588


The night before
  • 2  bananas, diced (quarter the banana along the length then slice)
  • 1/3 cup tamarind concentrate
  • 2 Tbsp brown sugar
Mix together all ingredients and store in fridge overnight.

The day of
  • 32-ish wonton wrappers or 8-ish spring roll or egg roll wrappers.
This is the easy part or the hard part, depending on your skill level. As a midwestern White suburban American, I have little to no experience in making wrapped/rolled/stuffed foods so mine always turn out... interesting. I played around with wontons vs. spring rolls, and ended up choosing the latter. The wontons probably have a better ratio of inside stuff to outside stuff, but I couldn't make them without making a huge mess, and it was sometimes hard to get enough filling inside.

Anyways, fill your skins with an appropriate amount of filling (I didn't have any problems with air bubbles expanding and popping, but the marinade oozes out when you are trying to close it), then seal with water (or the leftover egg whites from the ice cream recipe). Fry at 350F until golden brown. I got criticized last time for my lack of photography, so here are some action shots (side note, my camera now has cooking oil, egg whites, and tamarind sauce all over it):


DSCN1583
(Notice my misshapen wrappers)

DSCN1584
(Notice my misshapen egg rolls)


Serving

To serve, place a big ol' scoop of the ice cream in a bowl, slice two spring rolls in half (or use four wontons) and place fancily around the outside, then drizzle everything with brown sugar. Pretend that because it has fruit it must be good for you, and eat a second serving as well :)


DSCN1587

Monday, August 2, 2010

Asian Peppered Cucumber Salad

It's that time again, FoodieFights Battle Cucumber and Black Pepper. This week I've decided to go with something I hardly ever do: a side dish. Not only that, but it's a vegetarian side dish. Hold on to your hats people, as I bring you:

Asian Peppered Cucumber Salad
  • 1 medium to large cucumber, skin on
  • 1 small clove garlic, grated or very finely minced
  • 1 tsp fresh ginger, grated or finely minced
  • 2 Tbsp soy sauce
  • 2 Tbsp honey
  • 2 Tbsp rice wine vinegar
  • 2 Tbsp sweet Thai chili sauce
  • 2 Tbsp olive oil
  • Bunches o' fresh cracked black pepper
  • 1 scallion, thinly sliced
 Thinly slice the cucumber, or, if you are lucky enough to have a nifty attachment to your mandolin, slice into very fine strips, as shown in the picture below. If using the mandolin, avoid the seedier areas of the cucumber, because you might get mugged. Also, they mostly just smash up instead of slicing nicely. Place the strips or slices in a colander for about a half hour to drain any excess moisture.

In a medium-sized bowl, whisk together all the other ingredients except the scallions. The mixture should be salty (from the soy), sweet (honey, chili sauce), tangy (vinegar) and spicy (chili sauce, pepper), but not too much of each. I didn't measure how much pepper I added, but it was quite a bit; you want enough to have a distinct flavor. Add the scallions and cucumber and let the whole mixture marinate for a few hours or overnight.

Note: there is a pretty generous marinade/cucumber mixture, which leads to an intensely flavored, but somewhat saucy, end product. If you wanted to keep the flavor, just drain off the extra marinade before serving (it could, perhaps, be used as a stir fry sauce base). Otherwise you can cut the marinade in half, or, if you've been making the recipe as you read and have just now gotten to this part, add another cucumber. Either way, it should still taste wonderful.


Asian peppered cucumber salad
(Biggie Size Me)

Serving

Since it's a side dish, I though I might contemplate what this cucumber salad should go along with.The dish has a very bright flavor, which would pair nicely with a fatty Asian pork (Chinese spareribs?) or duck (Peking duck?) dish. It also, despite the heat from the chili sauce, has a nice cooling effect which would go nicely to calm down a spicy Szechuan beef. And of course, let's not forget about sushi! Or you could do what I did and just enjoy it by itself. Anyway you slice it (get it? Because you can sliced in slices or... oh nevermind), I think you'll enjoy it.

Monday, July 19, 2010

Sweet Potato Mousse with Espresso Chocolate Sauce

This week's FoodieFights is Battle Sweet Potato and Coffee. It's a tough battle for me, because while I love sweet potatoes, I hate coffee. In fact, before creating this recipe, I've never even made a cup of coffee before. So my challenge today wasn't so much how to combine sweet potatoes with coffee (I immediately had several ideas) but how to combine them into something that I would actually eat. After considering several ideas, I decided to go with a dessert. After all, most new coffee drinkers drown their coffee with sugar and cream, right?

Sweet Potato Mousse
  • 1 sweet potato (about 8 oz), peeled and diced
  • 2 oz. cream cheese
  • 1/2 c. powdered sugar
  • 1 tsp vanilla
  • 1 tsp ground cinnamon
  • 1/2 tsp fresh ground nutmeg
  • 1/2 tsp ground clove
  • 1 cup heavy cream, very cold
Cook the sweet potato in salted boiling water, then drain well and chill. Once the potatoes are nice and cold, add the cream cheese, powdered sugar, vanilla, and spices. Beat on very low speed until combined, then ramp up the speed and beat until smooth and slightly fluffy.

Next, beat the heavy cream until it attains a medium firmness. If you overbeat here, then in the next step you will make sweet potato butter. It actually sounds like that might be tasty, but it's not what we're going for. Fold in about a third of your whipped cream with you sweet potato to lighten it up, then throw the sweet potato back into the whipped cream. Fold well, then whip again at medium speed until it attains a nice mousse-y firmness. Chill in the fridge while you make the...

Espresso Chocolate Sauce
  • 1/2 cup sugar
  • 1/2 cup cocoa powder
  • 1 healthy pinch of salt
  • 1 cup fresh hot espresso (or double-strength coffee)
  • 1 tbsp coffee liqueur
In a small saucepan, whisk together the dry ingredients, then slowly whisk in the espresso and liqueur. I've found that if you whisk it into a paste then slowly add more liquid it keeps you from having chunks of undissolved bits of chocolate. Heat the mixture slowly. Boil for about a minute, then let cool. It should thicken as it cools, becoming the consistency of bottled chocolate syrup.


The Reveal

All you really need to serve this is a spoon for the mousse and a big bowl of sauce, but if you plan on serving this to someone instead of eating it all yourself, it's not hurt by a nice sprinkling of candied pecans:

Sweet Potato Mousse with Espresso Chocolate Sauce


The dessert as a whole is really quite a trip. You are immediately hit with the smokiness of the coffee, which I'm not supposed to like, but I'm surprised to find that I love it. Next comes the creaminess of the mousse with a delicate but definite hit of sweet potato, and it's rounded out with the deep, dark sweetness of chocolate.